This particular assignment was learning how to re target animation to different meshes.
Friday, December 18, 2015
Animation Retargeting
The semester is over and I am uploading some assignments that I may have missed uploading.
This particular assignment was learning how to re target animation to different meshes.
This particular assignment was learning how to re target animation to different meshes.
Sunday, December 13, 2015
Final Project: Environment Assets
Our last two-three weeks of class have been working on assets to put on an island. Each of my classmates took an asset or two depending on complexity and we had to match styles and merge all of our assets together.


My assets were a banana tree, grass and ferns.
Here are my final rendered shots in Maya. I will add a UE4 screenshot when it becomes available.


Wednesday, December 2, 2015
Drawing Fundamentals
I am not sure if I mentioned it before, but we do have a traditional drawing class every Friday - separate from our figure drawing class.
This weeks assignment was to use techniques from Feng Zhu to learn how to come up with and create small environment clips and ideas.
To begin, you start with a grid in Photoshop that separates about 10 or so spaces to draw in. Then you plop 30-40 images down in a sort of color vomit or collage chaos.
This helps your brain try to pick out different shapes and colors and pull something from the chaos. Not all the clips will be successful, I had 2 or 3 that weren't... but this is what I ended up with.

I enjoyed trying out the different color palettes and trying to make them fit. The first one I did was the bridge in the upper-left corner, then I trickled to the upper-right. I then moved to the bottom panels and filled in the middle last.
The two-three panels I felt didn't work for me is the top-right (huts around a lake?), the bottom lower-right (desert) and the one above that (man vs temple).
I did have a few favorite too, the second row, bottom-left, and the pink temple were some I really liked.
From here, we had to pick one of the panels we liked and flush it out more. I choose the pink temple because it had a nice color scheme. Here is my final result.

Continuing Work...
Happy December! A lot of the work I've been doing has been for the same projects and cleaning them up for our final project.
I am still working on my banana trees and will sculpt and bake out some maps for our final environment.
We have also been introduced to BluePrints more in UE4! They are still frustrating to learn for now, but it is much easier to keep playing with them until they work. Working in real code I tend to freeze because I can't think of what else to do... Using this visual scripting allows me to just keep trying different nodes so it's a pretty take on what coding could be.
Saturday, November 14, 2015
Week 12 - 2D3D: Environment Art
Something I am REALLY excited for!! I believe I have decided I want to be an environment artist!! Loving environments are new for me, but the more I look at them, the more I want to learn how to make environments and plants look beautiful and fitting for what they need to look like!
For our next assignment in 2D3D, our group signed up to do a few assets for an island inhabited by Starfish men (or drunk Patricks).
Since I want to do environment art, I signed up for what I thought would be great core basics for any beginning environment artist: grass, ferns and a banana tree! :)
I can't wait to play with planes for foliage and learning transparency for leaves and grass.
We had to create proxy art, so here is a screenshot of my proxy art for the grass, fern and banana tree.

Common Art: UE4 Blueprints
Along with all the other things I am doing, I am learning a bunch of UE4 things! I REALLY want to get better as using Blueprints and Materials in UE4. :) It is such a unique and interesting tool that artists can use and have access to!
Tutorials here I come!
For now, here was my first time playing with blueprints - figuring out how to make things move upon entering an area as well as on a key press.
**Disclaimer: Starfish model and materials were created by the teacher.
Tutorials here I come!
For now, here was my first time playing with blueprints - figuring out how to make things move upon entering an area as well as on a key press.
**Disclaimer: Starfish model and materials were created by the teacher.
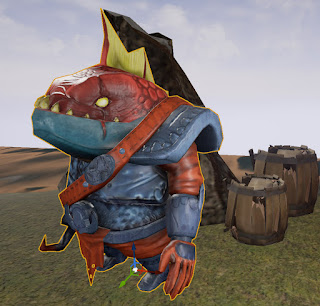
Week 11: 2D3D: Final Fish Pirate
Last week we finished up the fish pirate! Yay! This was such a massive project, and definitely helped me understand what is involved for more major character models. I had never done anything like this before.
After I finished sculpting the pirate and baked the maps onto my low-res model, I pulled up Mudbox and Photoshop to start painting. Most of my time was spent in Photoshop, but I liked having the model update in Mudbox so I could tell how the model was looking. This is my final color map.

Learn & Grow
1. While I am getting more used to the flow, this project took so long that I felt a little disconnected week after week since I was in one program for such a long time! I think I have the flow down, but I continue to learn more tips and tricks to make it easier. In the beginning, I was confused on having a high and low-res model, but that's become clear now.
2. My sculpt lines still aren't deep enough! I really need to not be afraid and really make some things shine.
3. I do like coloring! The coloring of the model was pretty fun for me. I enjoyed the mixed process of Mudbox and Photoshop. The next thing I need to learn is Substance Painter apparently!
4. Practice, practice, practice! Like all things, this work will only get better from here on out! :)
After I finished sculpting the pirate and baked the maps onto my low-res model, I pulled up Mudbox and Photoshop to start painting. Most of my time was spent in Photoshop, but I liked having the model update in Mudbox so I could tell how the model was looking. This is my final color map.

I applied this map to the final model in UE4 and the final result of the pirate is below.

Learn & Grow
1. While I am getting more used to the flow, this project took so long that I felt a little disconnected week after week since I was in one program for such a long time! I think I have the flow down, but I continue to learn more tips and tricks to make it easier. In the beginning, I was confused on having a high and low-res model, but that's become clear now.
2. My sculpt lines still aren't deep enough! I really need to not be afraid and really make some things shine.
3. I do like coloring! The coloring of the model was pretty fun for me. I enjoyed the mixed process of Mudbox and Photoshop. The next thing I need to learn is Substance Painter apparently!
4. Practice, practice, practice! Like all things, this work will only get better from here on out! :)
Sunday, November 1, 2015
Producer: Game Design Document
Along with doing my art classes, I've also been sitting in on the Producer classes, wanting to learn more management and how to think more creatively. I really enjoy these classes, and I have been learning a lot from them.
Our capstone game pitches will be this week, and I have decided to pitch a game.
To prepare for this, I created something called a Game Design Document, or a GDD. It outlines many core features of your game and how they will work within your game. I spent an entire week working on it and designing it.
It was an enriching experience as I had to come up with idea, and plan what will make it unique or different.
I'll admit there are a few things I need to add or tweak, but I believe as a game, it has strong base functionality. (But then again.. of course I would. I thought up the idea?)
The document ended up being nine pages long, 10 if you include the cover page.
So between working on this GDD and working on my fish pirate, I've been very very busy.
2D3D: Week9-11 Pirate Fish Process
I haven't been posting lately because I've been so busy! Allow me to catch up to what I've been up to for the past few weeks.
We began working on the Pirate Fish model and it took about 1 week to model it following the best practices and tutorials. My pirate ended up more plump than the rest of the students I feel, but I am okay with my fish not being as well-built.

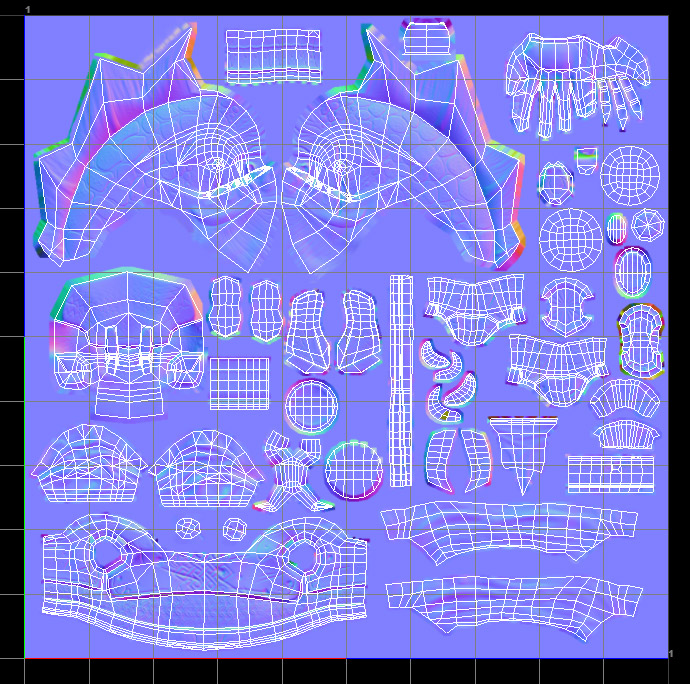
From here, we set aside another week to UV the whole model. I separated all of the UVs because Unreal Engine does not support overlying UVs.

After the UVing was done, the final step was to separate the whole model into poly sets. Poly sets make sculpting in Zbrush easy since it imports the model as layers.
It took another week to sculpt the pirate fish. It was made clear to us that we needed to follow the concept art as closely as possible, since that what concept art is created for.

I learned that my sculpt still does not contain the appropriate amount of small, medium and large details so that is something I will need to continue to keep in mind. I made a note of this on my previous sculpts, but I am still not brave enough apparently! My sculpt lines need to be DEEPER and THICKER. It does looks so much better when the details pop, and I still sculpt too soft for the details to really be seen. So, another mental note here.
This week, we will be baking the normal maps and begin painting the model. I did finish baking the normal maps and putting them on my model, so I will place my current progress here. Baking the normal maps was a very time-consuming process. Since the model was broken apart in ZBrush, you need to export each individual poly set (or subtool layer in Zbrush), and bake each piece separately. In Maya, the model should have been combined when you bring it into Zbrush. Since it is one piece, you need to break apart your model back into individual poly set groups and bake each group separately. However many poly sets you have, is how many Normal maps you have. After you've baked each set out, you need to take that bundle of Normal maps and put them all into one normal map using Photoshop. THEN you need to recombine your entire model again and apply that final normal map.
*Takes a deep breath* Whew! It certainly is a lot! And you have to keep in mind to make your AO maps along with them, so you're really baking twice for 1 poly set.
My normal maps bakes out decently. I had to fix a few of the edges on the head and around the belt. I was disappointed that the smaller, finer details are quick to get lost on a low-res bake.
So these are my normal maps....


We began working on the Pirate Fish model and it took about 1 week to model it following the best practices and tutorials. My pirate ended up more plump than the rest of the students I feel, but I am okay with my fish not being as well-built.

From here, we set aside another week to UV the whole model. I separated all of the UVs because Unreal Engine does not support overlying UVs.

After the UVing was done, the final step was to separate the whole model into poly sets. Poly sets make sculpting in Zbrush easy since it imports the model as layers.
It took another week to sculpt the pirate fish. It was made clear to us that we needed to follow the concept art as closely as possible, since that what concept art is created for.

I learned that my sculpt still does not contain the appropriate amount of small, medium and large details so that is something I will need to continue to keep in mind. I made a note of this on my previous sculpts, but I am still not brave enough apparently! My sculpt lines need to be DEEPER and THICKER. It does looks so much better when the details pop, and I still sculpt too soft for the details to really be seen. So, another mental note here.
This week, we will be baking the normal maps and begin painting the model. I did finish baking the normal maps and putting them on my model, so I will place my current progress here. Baking the normal maps was a very time-consuming process. Since the model was broken apart in ZBrush, you need to export each individual poly set (or subtool layer in Zbrush), and bake each piece separately. In Maya, the model should have been combined when you bring it into Zbrush. Since it is one piece, you need to break apart your model back into individual poly set groups and bake each group separately. However many poly sets you have, is how many Normal maps you have. After you've baked each set out, you need to take that bundle of Normal maps and put them all into one normal map using Photoshop. THEN you need to recombine your entire model again and apply that final normal map.
*Takes a deep breath* Whew! It certainly is a lot! And you have to keep in mind to make your AO maps along with them, so you're really baking twice for 1 poly set.
My normal maps bakes out decently. I had to fix a few of the edges on the head and around the belt. I was disappointed that the smaller, finer details are quick to get lost on a low-res bake.
So these are my normal maps....
And this is my Final Normal map applied to my low-res (or Game-res) model.

Next we are painting! So I have to take this combined model again, and send it into Mudbox to paint according to the concept art. We are doing that this week, so I should be able to post the results after this week is over! :)
Wednesday, October 21, 2015
Week 8: Environment
Last week we worked in teams of three to build a small landscape. I was in charge of creating the landscape and placing the different textures down. My other two classmates were in charge of the skydome and the foliage.
Environment is something I want to focus on, and this was getting my feet wet with playing with UE4 environments. I was able to play with setting up the material and figure out how to paint the landscape with free textures on the UE4 Marketplace.

Environment is something I want to focus on, and this was getting my feet wet with playing with UE4 environments. I was able to play with setting up the material and figure out how to paint the landscape with free textures on the UE4 Marketplace.

Wednesday, October 14, 2015
Common Art: Week 7 - Setting up UE4 Materials
Last week's assignment was to go into UE4 and set up materials. Setting up the materials is very important since you are able to adjust and change parameters inside of the engine. This could be important if you need to change an aspect of your model to get it to look better.
The canon and the starfish were provided by the teacher, and using his example I adjusted the material and added some attributes to play with.


The canon and the starfish were provided by the teacher, and using his example I adjusted the material and added some attributes to play with.


Wednesday, October 7, 2015
Life Drawing: Learning Anatomy
I wish I could post my figure drawings on here! As Life Drawing applies, we are drawing nude models and learning anatomy. This is the first time this has been available to me, and it has been invaluable.
We have finally covered all the skeleton, muscles and smaller features of the body such as eyes, lips, noses and mouths. It has noticeably improved my drawings just by attempting to identify and draw muscles where muscles should be.
One thing I have found an interesting love for is something we studied in our Drawing Fundamentals class: Value of color, mainly black and white.
We were shown examples of pure black and white drawings with only shading and it was some of the most beautiful art! I would really love to do a few value study drawings and I am applying them to my nude drawings and trying to figure out how to get the look I want.
By doing this, I've identified problems with my art...meaning, I realized I am not sure how to get the effect that I want. When I look at a fold in a piece of clothing, I can see the light and dark, but I can't seem to get it to look right.
Doing these value studies, I believe it will help me accomplish the look I want in digital painting and clothing.
I learned all this by doing these Life Drawings every Friday.
RPP2: Rapid Proto-type Production - Robo444
This is our second RPP. What is an RPP? It is Rapid Proto-type Production. We get assigned into groups of 4 or 5 students and we build a proto-type game in two weeks! Its a lot of hard work and it really pushes everyone's skills and creative juices in a good way. Typically the groups consist of a producer, two programmers and two artists. I was the only artist this round with two programmers and two producers, so much of the look and feel of the game was up to me.
I was proud of this round and wanted to post some of my art and concept art from the project. I was able to use a lot of what I've learned so far in my drawing classes to make sure everything flowed easy.
Our game was called Robo444 and the theme of the game was narrative. We ultimately came up with an idea about a robot who gets short-circuited from a hive-mind mentality and learns to discover himself off the network.
One of the things we learned from our drawing class was to first come up with character silhouettes. These were a few designs that I created. From this silhouettes below, number 11 was picked as the winner from the team.

Once the silhouette was created, I drew out a color version of the character. Later, all the blue turned to red to make the robot more evil looking since the robots in the story were capturing and destroying mankind.


After the concept sketches were approved and well-received by the team, I went ahead and created a model and UVs for the character.


I did sculpt the model a bit, but ultimately that version wasn't used for various reasons.
This was all the color I placed on the robot. The red stripe going across it's flank and the red eye and yellow flashlight.
I also modeled and textured a variety of assets including:
- Broken CD
- Cigarette Box
- Ripped Concert Tickets
- Newspaper (Where I used Alpha to make the edges wavy)
- Radio
- Saxophone
- Soda Can
- Street Sign
- Trash Can
I also modeled a variety of repeatable textures for our subway scene.
The first four are different cement floor textures.
The next set is a series of walls to use in our subway. These are all repeatable and I looked up references of real subways to get an idea for the decoration and design.


After this, our game was a narrative and we decided to use cutscenes to tell major parts of the story. In total, I did 9 of these scenes.
The opening consisted of these three shots in order:

I am particularly proud of this scene since I applied composition to these shots according to what I learned in drawing class.


The middle three sequences were "memory" sequences, once again in the order they appeared in the game:


And lastly, here are the final three sequences in order:


After I finished the important scenes, I worked on the logo and some other graphical design assets to use for our game.


Overall this was a fantastic game to work on. The game turned out really well I believe and my team really worked as a team the later it got in the project. Everything was finished comfortably and no one felt extremely rushed. I was thankful to be apart of this game project!
Common Art: Week 6 - Tiling Textures in Zbrush
This week's assignment was a split path... create a tiling texture or color a character model in Zbrush. I opted for more of an environment approach and selected the tiling texture.
This was a great assignment! Environment is something that is frequently overlooked with younger artists and it's invaluable to learn how to set up a great environment as well as great characters to go inside of it.
It took me two tries of the stone to get the seams to match up, but I eventually got it!
This tile consists of a: Normal map, AO map, Depth map, Specular map, Shadow map, Color map and lastly, the render map.

Subscribe to:
Posts (Atom)